How to Customize MDX Code Blocks in Next.js 14: Styling, Syntax Highlighting, and Copy to Clipboard Functionality
Welcome to Part 2 of our series on building a beautiful blog using Next.js 14, MDX, and TailwindCSS!
In our previous post, we explored how to set up a simple yet elegant blog structure.
Today, we'll take it a step further by customizing the styling of code blocks in your technical blog posts and adding a handy code copy button to enhance the reader experience.
What You’ll Learn:
- Creating a CodePre component to style MDX code blocks.
- Integrating this component into your MDX setup.
- Adding a copy-to-clipboard button to your code blocks.
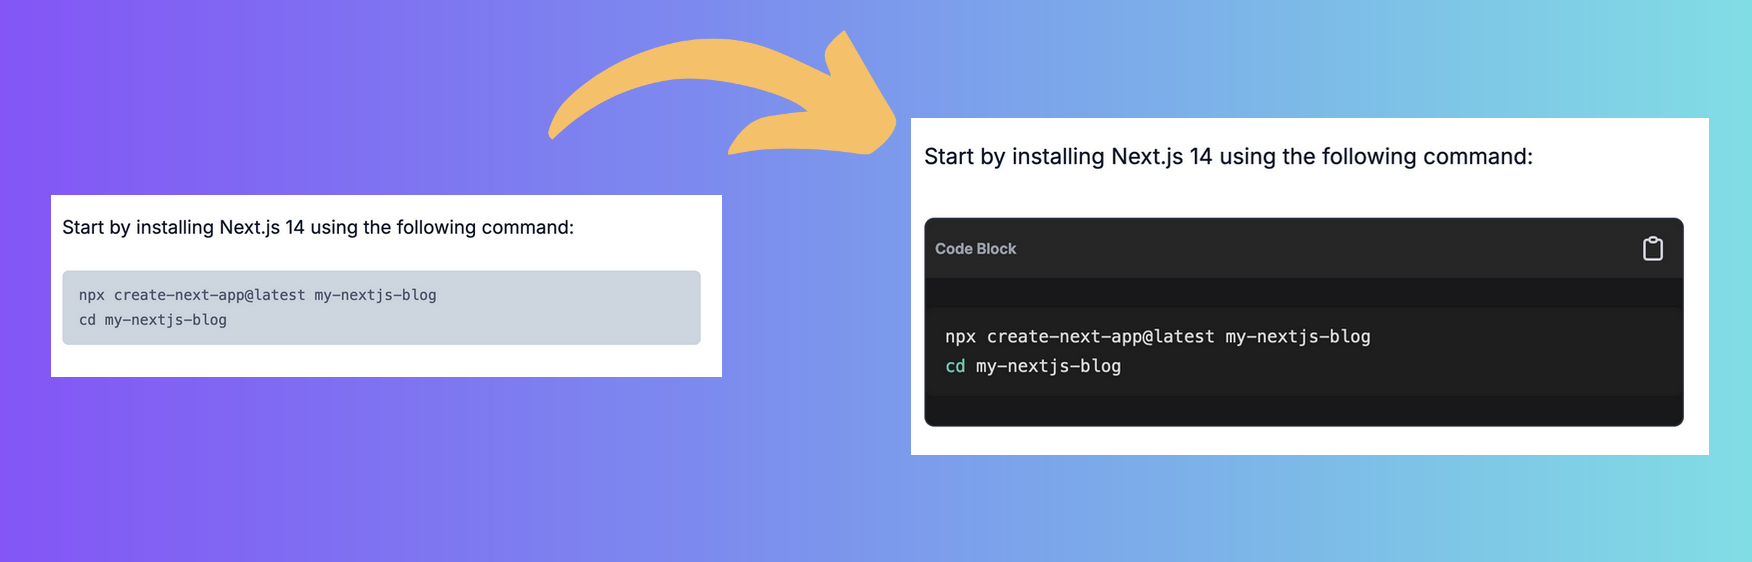
1. Creating a CodePre Component
To style the code blocks generated from MDX, we'll create a CodePre component that customizes the pre tag. This component will be responsible for styling using TailwindCSS and functionalities like line numbers and copy-to-clipboard buttons.
// components/CodePre.js
'use client'
import { useState, useRef } from 'react';

const Pre = ({ children }) => {
  const textInput = useRef(null);
  const [copied, setCopied] = useState(false);

  const onCopy = () => {
    setCopied(true);
    navigator.clipboard.writeText(textInput.current.textContent);
    setTimeout(() => {
      setCopied(false);
    }, 2000);
  };

  return (
    <div className="my-8 bg-zinc-900 rounded-lg border border-gray-700">
      {/* Toolbar/Header with Copy Button */}
      <div className="flex justify-between items-center p-2 bg-neutral-800 rounded-t-lg">
        <span className="text-xs font-semibold text-gray-400">Code Block</span>
        <button
          aria-label="Copy code"
          className={`h-8 w-8 rounded p-1 ${
            copied
              ? 'border-green-400 focus:border-green-400 focus:outline-none'
              : 'border-gray-600'
          }`}
          onClick={onCopy}
        >
          <svg
            xmlns="http://www.w3.org/2000/svg"
            viewBox="0 0 24 24"
            stroke="currentColor"
            fill="none"
            className={copied ? 'text-green-400' : 'text-gray-300'}
          >
            {copied ? (
              <>
                <path
                  strokeLinecap="round"
                  strokeLinejoin="round"
                  strokeWidth={2}
                  d="M9 5H7a2 2 0 00-2 2v12a2 2 0 002 2h10a2 2 0 002-2V7a2 2 0 00-2-2h-2M9 5a2 2 0 002 2h2a2 2 0 002-2M9 5a2 2 0 012-2h2a2 2 0 012 2m-6 9l2 2 4-4"
                />
              </>
            ) : (
              <>
                <path
                  strokeLinecap="round"
                  strokeLinejoin="round"
                  strokeWidth={2}
                  d="M9 5H7a2 2 0 00-2 2v12a2 2 0 002 2h10a2 2 0 002-2V7a2 2 0 00-2-2h-2M9 5a2 2 0 002 2h2a2 2 0 002-2M9 5a2 2 0 012-2h2a2 2 0 012 2"
                />
              </>
            )}
          </svg>
        </button>
      </div>

      {/* Code Block */}
      <pre ref={textInput} >
        {children}
      </pre>
    </div>
  );
};

export default Pre;
2. Adding CodePre to mdx-components.js
Next, let’s integrate our CodePre component into the MDX setup by adding it to mdx-components.js. This will allow Next.js to use our custom component for rendering code blocks within MDX content.
Update your mdx-components.js as follows:
// mdx-components.js
import Pre from '~/components/CodePre';
export function useMDXComponents(components) {
    return {
      pre: (props) => <Pre {...props} />,
      ...components,
    }
  }
This setup tells MDX to replace the default pre tags with our custom CodePre component whenever it encounters a code block (enclosed by triple backticks).
3. Adding Syntax Highlighting to MDX Code Blocks
To make your code blocks not only stylish but also more readable and attractive, adding syntax highlighting is essential. There are several popular libraries available that can help with this, including:
- Prism.js - A lightweight, extensible syntax highlighter with a wide range of themes and plugins.
- Shiki - A code highlighter that uses TextMate grammars and renders to the terminal or HTML.
- Highlight.js - A robust and widely-used syntax highlighter that supports many languages and themes.
For this guide, we’ll use Highlight.js due to its simplicity and broad language support.
Step 1: Choose a Theme
First, you'll need to select a theme for your code blocks. Highlight.js offers a variety of themes that you can preview on their demo page . Pick a theme that fits the overall aesthetic of your blog.
Step 2: Download the CSS
Once you've chosen a theme, download the corresponding CSS file from the Highlight.js GitHub repository. For example, if you like the "VS2015" theme, download the vs2015.css file.
Step 3: Apply the Styles in Your Next.js Project
To apply the styles, you'll need to import the CSS file in your Next.js project. Depending on whether you want to style code blocks in specific posts or across all blog posts, you have two options:
a) For a specific blog post: Import the CSS directly in the page component of the blog post.
// blog/firstpost/page.jsx
import FirstPost from '~/blogsrc/first.mdx';
import "~/styles/vs2015.css";  // Import the chosen Highlight.js theme CSS

export default function BlogPost({ source }) {
  return (
    <FirstPost />
  );
}
b) For all blog posts: Create a layout file (e.g., layout.jsx) in the /blog directory and import the CSS there. This will ensure the styles are applied globally across all blog posts.
// /blog/layout.jsx
import "~/styles/vs2015.css";  // Import the chosen Highlight.js theme CSS

export default function MdxLayout({ children }) {
  return <>{children}</>;
}
Conclusion
With these steps, you now have a customized setup for styling and enhancing code blocks in your MDX-based blog posts using Next.js. By creating a CodePre component and integrating it with MDX, you can style your code blocks beautifully and add helpful features like copy-to-clipboard. This not only improves the look of your blog but also enhances the usability for your readers.
Stay tuned for the next part of our series, where we’ll dive deeper into further optimizing and customizing your Next.js blog setup!